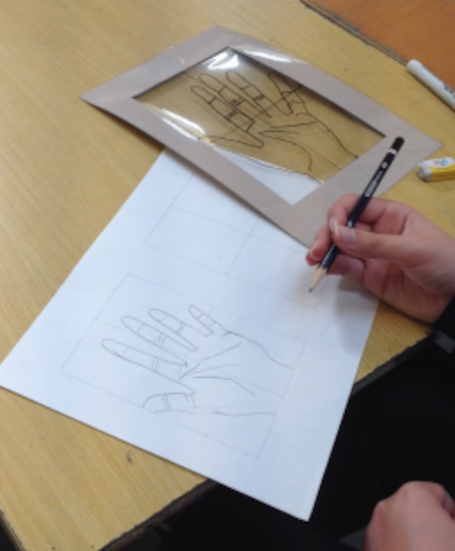
Uncategorized

weaving – with wool, fabric, ribbons, threads…

weaving – with wool, fabric, ribbons, threads…

This week we made our own looms out of cardboard (cut along two edges with pinking shears) and used them to weave amazing patterns using wool, fabric, threads, ribbons – all sorts! The colours the kids combined were fantastic. This activity suits those who like to work slowly – really getting into the zone – rather than those who are easily  bored with repetitive activities. It’s also one for those who like working with different textures – all the results are just begging…

Needle felting – 2d and 3d

Needle felting – 2d and 3d

This week everyone did a lot of stabbing – though of course not themselves or each other. Needle felting works by repeatedly stabbing the fleece with a special, barbed felting needle. This mats the fibres together and the felt gradually takes on a shape or form. You can do this 2d on top of pre-felt (semi felted fabric) or 3d to make small forms (most made animals). Be careful to do the stabbing on top of a large sponge and be careful always…

Easy batik with glue!

Easy batik with glue!

This week we used glue instead of hot wax to form a resist against the acrylic paint. Originating in Indonesia, in batik  hot wax would be poured on using a tjanting (a kind of tiny pot on a stick with a hole in the bottom). Then when the wax is dry and hard paint is applied onto the material and it won’t go wherever the wax is. You can build up layers this way, and whatever colour is beneath the wax will be…

Using sewing as mark-making

Using sewing as mark-making

So this term we are exploring textiles – including felting, dying, weaving, and even construction. To kick off we started with sewing, a fundamental skill so many are denied the opportunity to learn these days. And one that will come in handy throughout the rest of the term. This wasn’t sewing as a technical exercise – instead I encouraged the children to see the thread as another way to make a mark, just like with a pencil or a brush. The size, direction…

Finished paper clay sculptures

Finished paper clay sculptures

So it was the last week of term this week and the kids  finished their paper clay sculptures, using either paint or torn paper (decoupage). I particularly loved the decoupaged ones which added a lovely texture, in keeping with the paper clay, as well as incorporating interesting patterns. But of course, the paint gave more control over the colours and texture. And some used both – see the goose and the perfume bottle! And one child even made a whole habitat for her…

Sewing sculptures

Sewing sculptures

This week and I challenged everyone to make paper/card sculptures with no glue or sellotape – only stitches! We used Barbara Hepworth for inspiration, particularly her pieces involving holes and wire, and discussed how we could achieve similar effects using toilet rolls, card and thread, as well as a hole punch for the holes.. It really is amazing what shapes and forms can be created just by cutting, folding and stiching together. And while most went for abstract,,Mateo manged to make a fish!

Wire and modroc sculpture – part 2

Wire and modroc sculpture – part 2

This week we were ready to add modroc to the wire sculptures we made last week. Though of course for some, the wire was a perfect medium for their creatures and they started afresh today. The trick with the modroc is to keep it wet while you’re working. If you let it dry it’s harder to add more layers, or to alter the ones you have. For this you also have to keep your water fresh – once it’s cloudy it needs replacing.…

Wire and modroc sculpture – part 1

Wire and modroc sculpture – part 1

For the last three weeks of term we are working on a sculpture project. First step was making the armature using aluminium wire. The kids chose a wide range of objects – animals, food items, flowers and body parts. The trick was working with a long piece, and leaving enough space to join the next. We had wire cutters and also long nose pliers for bending and manipulating the wire, which gives more control than using fingers. I showed them how to join…

Easy blending with oil pastels

Easy blending with oil pastels

So this week we tacked oil pastels. Technically this is painting but it feels much more like drawing. To create the most vibrant colours I suggested using three colours which are close together on the colour wheel in every section – so never using one pastel on it’s own. Then if you use each one in small circles, leaving tiny gaps, rather than blocking in an area like a felt tip pen, when you add another colour to fill in the gaps you…