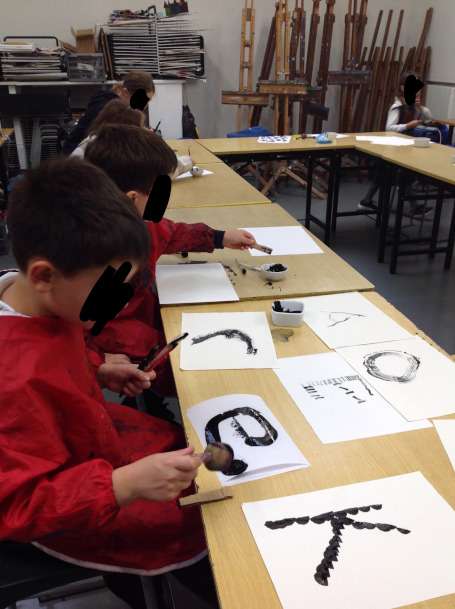
The theme for this term’s classes is text. Artists have used text in a wide variety of ways, and not always legibly. Think of Picasso’s use of newspapers in his collages, or Michaux’s development of asemic writing (week 2). Of course then there is illustration which uses text as the inspiration and comic books which marry words and images to create something else. We will look at all these are more during this term. For our first session we focused on inventing our…
Over two weeks (along with hat making – see my next post) the kids have been working with iron-on transfer dyes, also called disperse dyes. Here you paint onto paper and when it is dry you can iron what you’ve painted onto fabric. This is a great technique to play with as you do not have to simply transfer what you paint, you can cut it up, and mask areas when you are transferring – very much like printing. The first step is…
This week we made our own looms out of cardboard (cut along two edges with pinking shears) and used them to weave amazing patterns using wool, fabric, threads, ribbons – all sorts! The colours the kids combined were fantastic. This activity suits those who like to work slowly – really getting into the zone – rather than those who are easily bored with repetitive activities. It’s also one for those who like working with different textures – all the results are just begging…
This week everyone did a lot of stabbing – though of course not themselves or each other. Needle felting works by repeatedly stabbing the fleece with a special, barbed felting needle. This mats the fibres together and the felt gradually takes on a shape or form. You can do this 2d on top of pre-felt (semi felted fabric) or 3d to make small forms (most made animals). Be careful to do the stabbing on top of a large sponge and be careful always…
This week we used glue instead of hot wax to form a resist against the acrylic paint. Originating in Indonesia, in batik hot wax would be poured on using a tjanting (a kind of tiny pot on a stick with a hole in the bottom). Then when the wax is dry and hard paint is applied onto the material and it won’t go wherever the wax is. You can build up layers this way, and whatever colour is beneath the wax will be…
These two weeks we were busy with paper clay sculptures. Paper clay is a kind of paper mache, but the paper is mulched first before applying to the armature. I used this recipe from Jonni Good and it worked really well. The first step is to create the armature. What worked best was cardboard and scrunched up newspaper (careful to scrunch up the newspaper as tight as you can) but wire is also possible. Its really important that the sculpture is as tight…
This half term we had another eclectic mix of activities on offer. The sculpture activities seemed particularly popular – including making abstract sculptures out of bike parts, more delicate sculptures out of wet toilet paper (surprisingly able to hold a shape) and of course many varied and imaginative cardboard creations! This time we also had a few bold children embarking on a 3-day project in which a small group designed and constructed a fish tank, complete with a futuristic city inside – called…
This week I showed the kids some basic, and some more complex, ways of weaving with paper. With help from Naomi Kendall, who provided this helpful post on the subject, we made some beautiful designs, using both strips of coloured paper and strips of magazines to make some v beautiful patterns. Of course, you don’t need to keep to the regular patterns I demonstrated. Some adventurous children deviated from the patterns with strips of different widths, as well as colours which did not…
Exciting this week as the kids tried their hands at marbling – with some always unexpected, beautiful results. Marbling is an ancient technique of paper decoration, in which paint is dropped into the ‘size’ which is water thickened with a special powder. (traditionally a type of seaweed). Because of this thickener the paint sits on top of the surface of the water and from there it’s possible to take a print. Before you do that though you can manipulate the paint on the…
Last week of term this week so yes, it’s time to paint the modroc sculptures! Everyone came with brilliant ideas of how to paint the sculptures they’ve been making the past two weeks. We used acrylic paint which is easy to paint details or corrections on top, once dry. Some even added other elements such as tissue paper wings or paper clothing. Love the results!
This week we were ready to add modroc to the wire sculptures we made last week. Though of course for some, the wire was a perfect medium for their creatures and they started afresh today. The trick with the modroc is to keep it wet while you’re working. If you let it dry it’s harder to add more layers, or to alter the ones you have. For this you also have to keep your water fresh – once it’s cloudy it needs replacing.…
So this week we tacked oil pastels. Technically this is painting but it feels much more like drawing. To create the most vibrant colours I suggested using three colours which are close together on the colour wheel in every section – so never using one pastel on it’s own. Then if you use each one in small circles, leaving tiny gaps, rather than blocking in an area like a felt tip pen, when you add another colour to fill in the gaps you…
This week we made articulated creatures – so creatures with movable limbs. This activity really tested the kids’ ability to think like an engineer. After drawing their creature normally they had to work out which parts would move, then draw those parts separately, scaled up, not forgetting to include space for the parts and the body to overlap to contain the join. Not as easy as they first thought! The joins were simple wire spirals made on the front and back. This enabled…
This week we tackled autumn leaves in watercolours. They really are the most beautiful subject, i think, and perfect for this tricky medium. There are techniques for all levels from patient layering, fluid experimentation to even printing with the leaves (and combining all these as well!). Really the only proper rule is to start with the light colours first. The beauty of watercolour is all about letting the white of the paper shine through, thereby utilising their amazing, and unique, transparency. Then you…
This week we had great fun designing and making stencils. Using craft knives very carefully and either card or acetate the kids made really fun and interesting stencils, which they then worked with very imaginatively – working out how they could overlap as well as playing with the colours (high contrast worked well) and the sponges on sticks we used were great to blend with. It’s a really versatile print making technique.
Woo we are back – old and new faces, and a new class for teenagers! First week started irreverently with ‘updating’ (which could mean defacing) our collection of art magazines. I wanted the students to choose an image that resonated with them and find a way to change or update it. This could be with scissors, marker pen and/or the photocopier. Love what several did with splicing different images together (or the same one, changed) or using the photocopier to multiply the image.…
As autumn approaches I’ve been thinking back to the fun we had during the summer holiday classes. We sculpted, painted, constructed, drew, stamped, built, cut, stuck, collaged, printed… and more! Particularly loved the papier mache constructions so simple but effective. Make simple cardboard and/or newspaper base – we had a rabbit, a bus, a boat, a crown, a cake – it really can be anything as long as it’s stable enough – and then cover it in newspaper strips dipped in diluted PVA.…
This week the challenge was to make sculptures out of some sheets of white paper (and some tracing paper for an interesting alternative). After demonstrating how to safely use scalpels I showed them some basic methods to start with, but many invented their own methods. No sellotape and only small amounts of glue were needed to make these intricate and delicate sculptures – some were creatures, some were abstract, all were beautiful. This was a challenge set by Josef Albers to his students…
